Introduction
Many aspiring makers and early-stage hardware entrepreneurs have brilliant ideas but struggle with one fundamental challenge: transforming abstract concepts into physical, working prototypes. Without a structured process, teams waste time, money, and effort chasing dead ends, over-engineering solutions, or building features nobody needs.
Hardware product development is the structured journey of turning an idea into a functional product — and this guide focuses specifically on the path from initial concept to working prototype, the critical phase before manufacturing at scale.
Late-stage hardware mistakes are exponentially more expensive to fix than early ones. A U.S. GAO analysis found that programs changing requirements after system development had mean cost growth of 72%, versus just 11% where requirements stayed stable. Whether you're a student, a first-time hardware founder, or a maker with a half-formed idea, getting the process right from the start matters.
What follows covers the key development stages, how different prototype types serve different purposes, and the mistakes that trip up most first-time builders.
Key Takeaways
- Hardware product development follows a structured journey: ideation → concept design → engineering → prototype → testing. Skipping any step wastes time and money.
- A prototype is a learning tool, not the final product — it validates assumptions before committing to production
- Four main prototype types serve different purposes: proof-of-concept, looks-like, works-like, and MVP
- Most projects stall due to underestimating timelines, skipping user validation, and cramming too many features into early prototypes
- Working in a hands-on makerspace environment — with fabrication tools and experienced mentors on hand — can cut weeks off your prototyping timeline
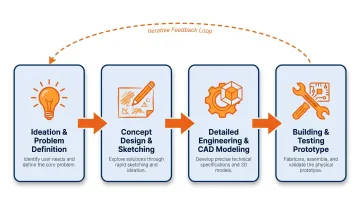
The Stages of Hardware Product Development: From Idea to Prototype
Hardware product development from idea to prototype typically follows four key stages. While this appears linear on paper, the process is inherently iterative—teams loop back between stages as they uncover new information through testing and user feedback.
Understanding why structure matters requires recognizing a critical difference between hardware and software: hardware decisions are harder to reverse. Physical components have lead times (some electronic components now have 26 to 40+ week lead times), errors caught late are exponentially more expensive to fix, and physical prototypes cannot be patched like software updates.
Stage 1: Ideation and Problem Definition
Every strong hardware product starts with a clearly defined problem, not just a solution. This stage involves:
- Market research and user interviews to validate whether your idea addresses a genuine need
- Problem mapping to understand the context, constraints, and user pain points
- Competitive analysis to identify what exists and where gaps remain
The outcome of this stage is concrete:
- A clear problem statement that articulates who experiences the problem and under what conditions
- A rough value proposition that explains why your solution is differentiated
- A basic product requirements document (PRD) that defines what the product must do, for whom, and under what constraints
According to research on hardware startup failures, 42% fail due to protracted development and 34% due to lack of product-market fit. Investing time in problem definition prevents building the wrong thing perfectly.
Stage 2: Concept Design and Initial Sketching
Once the problem is clearly defined, ideas take shape through quick sketches, rough diagrams, or simple CAD mockups. The goal is capturing form, user interaction, and key functional relationships. Perfection is not the point here.
This stage also involves early feasibility checks:
- Can this be built with available materials and components?
- Are there existing modules (microcontroller boards, sensors, breakout boards) that reduce development complexity?
- What are the rough cost implications?
For example, MIKROE reports 1,800+ Click boards available off-the-shelf, which standardize interfaces and eliminate custom bring-up work for many sensors and ICs, cutting prototyping time considerably.
Component availability deserves special attention during feasibility planning. As of late 2025, DDR4/DDR5 memory lead times have stretched to 26–40+ weeks, with DRAM prices rising up to 307% in constrained categories — which means a component that looks available on paper today may not be when you need it. Check lead times before locking in your design choices.
Stage 3: Detailed Engineering and CAD Modeling
Approved concept designs evolve into detailed engineering outputs:
- Circuit schematics and PCB layouts
- Mechanical CAD models with precise dimensions
- Bill of materials (BOM) listing every component needed
- Application of Design for Manufacturability (DfM) and Design for Assembly (DfA) principles
DfM and DfA principles, formalized in the early 1980s, simplify structures, reduce part count, and surface production constraints before they become expensive surprises.
Digital simulation and software-based validation play a crucial role at this stage:
- SPICE simulation for analog/mixed-signal circuits, originated at UC Berkeley in the early 1970s, enables early flaw detection
- Finite Element Analysis (FEA) for mechanical stress testing
- Circuit simulation tools to model performance before physical builds
Running these simulations before ordering a single component is one of the highest-leverage habits an early-stage hardware team can build.
Stage 4: Building and Testing the First Physical Prototype
Physical prototypes are built using accessible fabrication methods:
- 3D printing for mechanical parts (FDM and SLA resin options widely available through local print bureaus and online services)
- Laser cutting for precise 2D shapes and enclosures
- Breadboarding or PCB fabrication for electronics (services like JLCPCB offer fast, affordable turnarounds for hobbyists and startups)
- Hand assembly for initial integration
The first prototype's primary job is to answer specific questions, not to look finished. Many first-time builders trip up here by treating early prototypes as previews of the final product. They're not.
Prototyping is a loop, not a checkpoint: build → test → identify failures → fix → rebuild. Engineering firms report that simpler products require 3–5 prototypes, while complex or regulated products need 5–7 iterations before reaching stability.
Testing at this stage includes:
- Functional testing: Does it work as designed?
- Usability observation: Can a user interact with it as intended?
- Stress/durability checks: Does it hold up under real-world conditions?
Findings from each test cycle feed directly back into the next design iteration — the process compounds with each round.
Types of Prototypes Used in Hardware Development
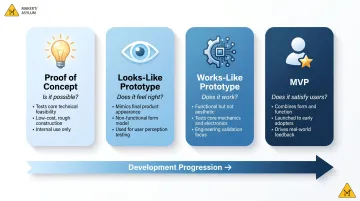
Different prototypes serve different purposes. Using the wrong prototype type for the wrong question wastes time and misleads decisions. Here are the four main types — and when each one actually makes sense:
Proof of Concept (PoC)
A PoC exists only to answer one question: "Is this technically feasible?"
- Often rough and non-functional in full
- Built quickly with whatever materials are available
- Example: Testing whether a specific sensor can detect a target signal in a noisy environment
Looks-Like Prototype
Form, aesthetics, and ergonomics take center stage here — the prototype may not work at all, but it communicates the physical design clearly before engineering is locked in.
- Useful for user feedback on size, feel, and visual design
- Helps stakeholders visualize the end product
- Built before engineering is finalized to validate design direction
Works-Like Prototype
Function matters more than appearance at this stage. The prototype may look rough or rely on off-the-shelf components in non-final configurations — what matters is proving that core features actually work.
- Validates engineering assumptions and performance
- Tests integration of electrical, mechanical, and firmware systems
- Often built with development boards and breadboarded circuits
MVP (Minimum Viable Prototype/Product)
The MVP combines looks-like and works-like into the most minimal version of the product that a real user can interact with. It's the natural endpoint of the progression — when you need real feedback from real people, not just internal validation.
- Used for beta testing and early user feedback
- Demonstrates value to stakeholders or investors
- Helps validate product-market fit before committing to tooling
Cadence's engineering guidance notes that using a looks-like model to answer performance questions — or vice versa — is a reliable path to rework and missed deadlines. Match the prototype to the question, not to what's easiest to build.
Key Factors That Affect the Hardware Prototyping Process
Several inputs directly impact how smoothly a prototype comes together:
Clarity of requirements: Vague or changing product specs are the leading cause of prototype rework. A well-documented PRD prevents teams from building the wrong thing.
Component availability and lead times: Hardware is constrained by physical supply chains. As noted earlier, memory components now face 26–40+ week lead times, and discrete semiconductors have tightened amid geopolitical risk. Research and plan for these delays early.
Skill set of the team: Prototyping across mechanical, electrical, and firmware domains requires different expertise. Identify gaps early and seek mentors, collaborators, or fabrication support.
Iteration budget: The first prototype almost never works perfectly. Teams need to plan financially for at least 2–3 build-test-fix cycles before reaching stability. Late requirement changes correlate with large cost growth, reflecting high rework risk when problems are discovered late.
Prototyping environment: Access to tools like 3D printers, laser cutters, soldering stations, oscilloscopes, and PCB fabrication services determines how quickly ideas can be physically tested. Without access to this equipment, iteration slows significantly — making shared spaces like makerspaces a practical advantage for early-stage builders.
Common Mistakes and Misconceptions in Hardware Prototyping
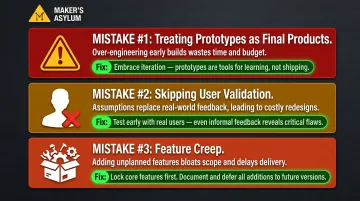
Most hardware projects don't fail because of bad ideas — they fail because of avoidable process mistakes. These three show up constantly, even among experienced builders:
- Treating prototypes as near-final products. Each prototype type serves a specific purpose. Rushing early-stage models toward production leads to premature scaling, wasted tooling costs, and assumptions that never got tested.
- Skipping user validation. Makers often build for what they imagine users want, not what users actually need. Even a cardboard mockup shown to five target users can surface insights that save weeks of rework. CB Insights' research on consumer hardware failures points to weak demand validation — not engineering quality — as a leading cause of failure. Juicero is the textbook example: technically impressive, practically useless.
- Feature creep. First-time builders pack every idea into the first prototype, which inflates cost, complexity, and build time. A prototype's job is to answer one critical question — not showcase the entire product vision. Build incrementally, validate, then add.
Why Your Prototyping Environment Matters
Hardware development is not a solo activity. Access to physical tools, fabrication equipment, and peer collaboration directly determines the speed and quality of iteration. A maker working at home with limited tools will iterate far more slowly than one with access to a well-equipped shared space.
An ideal prototyping environment offers:
- Fabrication tools across disciplines — 3D printing, laser cutting, CNC, electronics lab
- On-site components or rapid procurement so you're never blocked on materials
- Experienced mentors who've built hardware before and can troubleshoot real problems
- A peer community that brings fresh perspective and collaboration over competition
Approximately 5,500 makerspaces, fab labs, and hackerspaces exist globally, supporting education, workforce development, and innovation. Institutional spaces in libraries and universities show relative stability and continued expansion.
Maker's Asylum's makerspace in Goa provides exactly this kind of environment for students and early-stage hardware builders. Interdisciplinary labs covering woodworking, electronics, 3D printing, and laser cutting — backed by a community of experienced makers — mean participants can move from concept to working prototype in structured, mentored programs.
The Innovation School takes this further, combining 50+ hours of online skill-building in CAD, electronics, PCB design, and IoT with a 7-day hands-on residency. Teams build functional prototypes under expert guidance, supported by a global alumni network spanning 40+ countries.
Frequently Asked Questions
What are the stages of hardware product development?
Hardware product development typically moves through ideation, concept design, detailed engineering, prototyping, testing/validation, and manufacturing readiness. Early-stage builders generally focus on the first four stages before manufacturing becomes relevant.
What is the hardware production process?
The hardware production process refers specifically to manufacturing at scale. It follows the development and validation stages and involves manufacturer selection, Design for Manufacturing reviews, pilot runs, and supply chain setup.
What is the hardware prototyping process?
Hardware prototyping is the iterative cycle of building a physical version of a product concept, testing it against specific questions or requirements, identifying failures, and refining the design. This loop repeats until the design is stable enough to move forward.
What is a hardware prototype?
A hardware prototype is a physical, testable version of a product concept built to answer specific design or functional questions. Prototypes are learning tools that go through multiple versions before the design is production-ready.
What types of prototypes are used in hardware product development?
The four main types are Proof of Concept (PoC), looks-like prototype, works-like prototype, and MVP. Each serves a different purpose at a different stage of development.
What types of testing can be performed on a prototype?
Prototypes are typically tested for function (does it perform as designed?), usability (can a user interact with it naturally?), and durability under real-world conditions. Products heading toward certification also go through formal stages — EVT, DVT, and PVT.