Introduction
Imagine wanting to build a smart alarm that wakes you with LED lights synchronized to your music, or a motion-detecting device that texts you when someone enters your room. You know what you want to create, but the gap between idea and reality feels overwhelming. Where do you even start?
This is exactly where Arduino steps in. For students who dream of building real, functional devices but worry about complex code and intimidating hardware, Arduino offers the perfect entry point into hardware programming.
No prior experience needed. This guide goes from understanding what Arduino is to uploading your first working sketch.
TLDR:
- Arduino is an open-source microcontroller that reads inputs and produces outputs
- Programs use simplified C/C++ through the free Arduino IDE
- Every sketch has setup() (runs once) and loop() (runs forever)
- Blinking an LED confirms hardware, software, and code all work
- Beginners can build sensors, displays, robots, and IoT devices
What Is Arduino and Why Is It Perfect for Students?
Arduino is an open-source electronics platform that combines a microcontroller board with easy-to-use software. It reads inputs—a button press, sensor data, a light level—and converts them into outputs: turning on an LED, spinning a motor, or sending a message. All of this happens with just a few lines of code.
Popular Boards for Beginners:
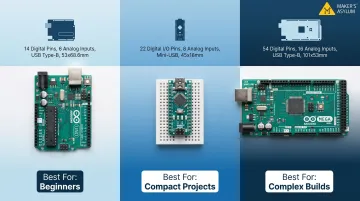
The three boards most suited for student projects are:
- Arduino Uno R3: The go-to starter board featuring 14 digital pins, 6 analog inputs, and a USB Type-B connection. It's the most documented board worldwide and the one used in all examples here
- Arduino Nano: Compact (45 mm x 18 mm), breadboard-friendly, with 22 digital I/O pins and 8 analog inputs—great for small projects
- Arduino Mega: Offers 54 digital pins and 16 analog inputs for complex builds requiring more connections
All concepts in this guide apply across boards, but we'll use the Uno R3 as our reference platform. The board you pick matters less than what you build with it—and that's where Arduino's real value for students comes in.
Why Arduino Works for Students:
Arduino's appeal for student projects comes down to four practical advantages:
- Starter kits are available for under ₹500, making entry-level hardware genuinely accessible
- A global open-source community has produced millions of tutorials, forum threads, and project walkthroughs in multiple languages
- The same platform powers real robotics, IoT sensors, and automation systems used by professionals
- Purpose-built for STEAM projects that blend science, technology, engineering, art, and math into one build
According to Arduino's platform data, approximately 30 million active users engage with Arduino globally, creating a vast network of shared knowledge and project ideas.
Setting Up Your Arduino: Board Selection and IDE Installation
The Arduino IDE (Integrated Development Environment) is where you write, compile, and upload code to your board. Two versions exist: IDE 1.8.x (legacy) and IDE 2.x (current recommended version).
Why Choose IDE 2.x:
Arduino IDE 2.x includes major improvements over the legacy version:
- Auto-complete for faster coding
- Built-in debugger for troubleshooting
- Integrated serial monitor (previously a separate window)
- Serial plotter for visualizing sensor data
Download the IDE from the official Arduino website.
Installation Steps:
- Download the IDE for Windows, macOS, or Linux
- Install the software following on-screen prompts
- Connect your Arduino Uno to your computer using a USB cable
- Open the IDE and go to Tools > Board > Arduino Uno
- Select the correct port at Tools > Port > [Your COM Port]
Board Not Detected?
If your board doesn't appear, check your USB cable first. Many cables are power-only and won't transfer data — use a data-capable USB cable instead. If the issue persists, try a different USB port or reinstall the drivers.
Once everything connects, you're ready to write your first program. Arduino programs are called "sketches," and every project follows the same loop: write, save, upload, test.
No Hardware Yet? Start with TinkerCad Circuits:
TinkerCad Circuits is a free, browser-based Arduino simulator. Write code and simulate circuits virtually before touching a single wire — a practical starting point if your kit hasn't arrived or you want to experiment risk-free.
The Architecture of Every Arduino Sketch: setup() and loop()
Every Arduino sketch—no matter how simple or complex—requires two functions: setup() and loop(). A "function" is simply a named block of instructions the Arduino executes when called.
setup() — Runs Once at Startup
The setup() function runs exactly once when the board powers on or resets. Use it to:
- Set pin modes (INPUT or OUTPUT)
- Start serial communication
- Initialize libraries
Think of setup() as your pre-game checklist — things you do once before the action starts.
loop() — Runs Continuously Forever
After setup() finishes, the loop() function runs continuously, repeating from top to bottom indefinitely. This is where the main logic lives—checking sensors, responding to inputs, controlling outputs.
Picture loop() as a security guard doing rounds — same route, over and over, always watching for anything that needs a response.
Using delay() for Timing
Arduino measures time in milliseconds (1 second = 1,000 milliseconds). The function delay(1000) pauses execution for one second.
Critical limitation: delay() freezes the entire program while waiting. For simple projects, this works fine. For complex projects reading multiple sensors simultaneously, use millis() instead. Unlike delay(), millis() tracks elapsed time without freezing the program — search "Arduino millis() tutorial" when you're ready to level up.
Essential Syntax Rules
Getting the timing logic right means nothing if your syntax is off. Before writing your first sketch, understand these requirements:
- Every statement ends with a semicolon (
;) - Code blocks are enclosed in curly braces
{ } - Comments use
//for single lines or/* */for multiple lines - The compiler throws errors if syntax rules are violated
Syntax errors are part of the process. When one appears, read the error message and check the line number it references — Arduino IDE points you directly to the problem.
Core Arduino Programming Concepts: Variables, Logic, and Functions
Variables and Data Types
Variables store information your program uses. Declare them with a type before use:
| Data Type | Purpose | Example |
|---|---|---|
| int | Whole numbers | int ledPin = 13; |
| float | Decimal numbers | float temperature = 23.5; |
| boolean | True/false values | boolean isOn = true; |
| String | Text | String message = "Hello"; |
Naming variables meaningfully makes code easier to read and modify.
Control Flow with if/else Statements
if/else statements let Arduino make decisions based on conditions — for example: "If a button is pressed, turn on the LED; otherwise, turn it off."
Basic structure:
if (condition) {
  // action when true
} else {
  // action when false
}
For Loops for Repetition
A for loop repeats an action a set number of times without copy-pasting code. Here's the basic structure:
for (int i = 0; i < 10; i++) {
  // repeated action
}
Practical example: fading an LED through 10 brightness levels by incrementing i each cycle.
Key Digital I/O Functions
These functions appear in almost every Arduino project:
pinMode(pin, mode)— sets whether a pin acts as INPUT or OUTPUTdigitalWrite(pin, value)— sets a digital pin HIGH (5V) or LOW (0V)digitalRead(pin)— reads whether a digital pin is HIGH or LOW
Analog Functions
analogRead(pin)— reads analog sensor values, returning 0–1023 for 0V–5VanalogWrite(pin, value)— uses PWM to simulate voltage levels, accepting values 0–255
Using the Serial Monitor for Debugging
The Serial Monitor is the most important debugging tool beginners can learn:
- Add
Serial.begin(9600);insetup() - Use
Serial.println(variableName);inloop()to print values
This displays sensor readings and variable values in real time on your computer screen, helping you understand what your code is doing.
Your First Arduino Project: Making an LED Blink Step by Step
Components Needed:
- Arduino Uno
- Breadboard
- One LED
- One 220Ω resistor
- Jumper wires
Why the Resistor?
The resistor limits current to protect the LED from burning out. A 220Ω resistor is the standard choice for 5V boards like the Uno.
Circuit Setup:
- Identify LED polarity: long leg = positive (anode), short leg = negative (cathode)
- Connect digital pin 13 to the positive leg of the LED via the 220Ω resistor
- Connect the negative leg to GND (ground)
With the circuit ready, open the Arduino IDE and enter the following sketch:
void setup() {
  pinMode(13, OUTPUT);
}

void loop() {
  digitalWrite(13, HIGH);   // Turn LED on
  delay(1000);              // Wait 1 second
  digitalWrite(13, LOW);    // Turn LED off
  delay(1000);              // Wait 1 second
}
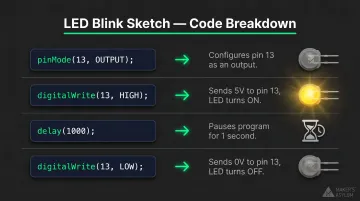
Here's what each line actually does:
pinMode(13, OUTPUT);— Configures pin 13 as an outputdigitalWrite(13, HIGH);— Sends 5V to pin 13, turning the LED ondelay(1000);— Pauses for 1 second (1,000 milliseconds)digitalWrite(13, LOW);— Sends 0V to pin 13, turning the LED off
Upload the sketch and your LED should start blinking. If it doesn't, work through this checklist:
Troubleshooting Checklist:
- Verify the correct board (Tools > Board > Arduino Uno) and port (Tools > Port) are selected
- Check you're using a data-capable USB cable, not a power-only cable
- Confirm LED polarity (long leg to pin 13, short leg to GND)
- Ensure the resistor is properly connected
What You Can Build Next: Real Projects and Learning Paths
After mastering the basics, most students move into projects that connect Arduino to the physical world. A few directions worth exploring:
- Sensor inputs — temperature/humidity (DHT11/DHT22), light, motion, and soil moisture sensors
- Displays — OLED screens for real-time data, LCD panels for interactive menus
- Motors and servos — directional robots, automated mechanisms
- Wireless communication — Bluetooth for device control, Wi-Fi modules for IoT applications like a mini weather station that posts data online
Extending Arduino with Libraries
Libraries are pre-written code packages that add new capabilities without starting from scratch. Install them directly in the IDE via Sketch > Include Library > Manage Libraries.
Three libraries beginners use constantly:
- DHT — reads temperature and humidity sensors
- Servo — controls servo motors with simple angle commands
- LiquidCrystal — drives LCD displays with minimal setup
Taking the Next Step
Self-guided tutorials get you started, but structured mentorship accelerates the jump from working circuits to complete, deployable devices. Programs like Maker's Asylum's Innovation School take students through real Arduino-based prototyping — from initial circuit assembly to full IoT device builds — inside a collaborative makerspace environment where iteration and experimentation are built into the process.
Frequently Asked Questions
What programming language is used for Arduino programming?
Arduino uses a language based on C/C++, simplified with built-in hardware functions like digitalWrite() and analogRead(). Any valid C/C++ code also works inside an Arduino sketch.
What software or platform is used for Arduino programming?
The Arduino IDE is the official free platform used to write, compile, and upload code. Version 2.x is the current recommended release. TinkerCad Circuits is a popular browser-based simulator for beginners who don't have hardware yet.
What is Arduino and how is it used in programming?
Arduino is an open-source microcontroller platform that bridges programming and physical electronics. It reads inputs from sensors and buttons and controls outputs like LEDs, motors, and displays through code called "sketches."
Can you make a controller with an Arduino?
Yes—students can build custom controllers for games, robots, home automation, and more. The Arduino reads button or joystick inputs and sends corresponding signals to motors, screens, or other connected devices.
Do I need prior programming experience to start with Arduino?
No prior experience is needed. Arduino's simplified syntax, clear documentation, and large community of free tutorials mean most beginners write working code within their first session.
What is the difference between setup() and loop() in Arduino?
These two functions form the backbone of every Arduino sketch:
setup()— runs once at power-on; used for initialization like setting pin modes and starting serial communicationloop()— runs continuously after setup; contains the main program logic that repeats indefinitely