Yet most people who want to start woodworking feel stuck. They don't know which tools to buy, what techniques to learn first, or what to make without wasting materials and money.
This guide covers essential tools, foundational techniques, safety basics, and beginner projects designed to build real confidence through hands-on doing—not just reading.
Key Takeaways
- Woodworking starts with accurate measuring and controlled cutting—master these before anything else
- A small starter toolkit (saw, drill, chisels, clamps, sandpaper) is enough to complete your first several projects
- Safety is non-negotiable—always wear eye, ear, and respiratory protection
- Build real projects from the start—not just practice cuts on scrap
- A makerspace fast-tracks learning: tools, mentorship, and community all in one place
Essential Tools Every Beginner Woodworker Needs
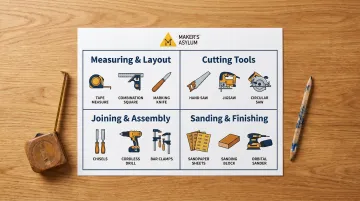
Beginners often over-invest early. Instead of buying everything at once, focus on a practical starter toolkit that covers four core functions: measuring, cutting, joining, and finishing. Leading woodworking schools advise beginners not to buy tools before training so they can learn their preferences first.
Measuring and Layout Tools
The must-haves are:
- Tape measure for overall dimensions
- Combination square for marking perpendicular and angled lines
- Marking pencil or marking knife for precise layout
Accurate layout is the foundation of every other technique. A poorly marked cut will never be fixed downstream—errors compound quickly in woodworking.
Cutting Tools
The three most beginner-accessible cutting tools are:
- Hand saw — portable, requires no power, and builds real feel for how wood responds to blade pressure
- Jigsaw — handles both curves and straight cuts; a safe first power tool for a wide range of projects
- Circular saw — efficient for longer rip cuts along the grain, but demands closer attention to safety
Choose based on the projects you want to build, not what looks most impressive.
Joining and Assembly Tools
Essential joining tools include:
- Start with four chisels (6mm, 12mm, 19mm, 25mm) and a mallet for joinery and cleaning up cuts
- Keep a cordless drill/driver on hand — it's the single most-used tool in any shop, from pilot holes to driving screws
- Get at least four clamps; they hold pieces in alignment while glue cures under proper pressure. Every woodworker eventually wishes they had more
Sanding and Finishing Tools
Start with:
- Sandpaper in multiple grits (80, 120, 180, 220)
- Sanding block for flat surfaces—prevents uneven sanding that fingers alone can't control
An orbital sander is a worthwhile upgrade once you're doing projects regularly, but hand sanding builds essential feel and control for beginners.
Core Woodworking Techniques for Beginners
Woodworking is a sequence of techniques—each one prepares the wood for the next. Getting these fundamentals right means everything downstream goes smoother.
Measuring and Marking Accurately
"Measure twice, cut once" is not just a saying—it's a habit that saves material and money. Use a combination square to mark perpendicular and angled lines consistently. For joinery work, marking knives produce more precise lines than pencils because the knife scores the wood fibers, creating a crisp reference line that prevents tearout.
Sawing: Making Straight and Controlled Cuts
Understand the difference between cut types:
- Cross-cut: Cutting across the grain (shortening a board)
- Rip cut: Cutting along the grain (narrowing a board)
Each cut type requires different saw teeth configurations. Technique matters more than tool power. Steady pressure, following the line, and not forcing the blade produce clean, accurate cuts. Let the saw do the work.
Joinery Basics: How Wood Pieces Connect
Three joinery types beginners should know:
- Butt joints — Two pieces meet at a right angle, secured with glue and screws. Quick to make, but the weakest option structurally.
- Dado and rabbet joints — Grooves cut into one piece receive another, adding strength and alignment. Common in shelves and cabinets.
- Mortise and tenon — A projection (tenon) fits into a matching hole (mortise). One of the most dependable furniture joints, used in chairs, tables, and cabinet frames. Worth learning early because the principle carries across nearly every furniture project.
Gluing and Clamping: The Invisible Skill
A properly glued wood joint is actually stronger than the wood itself when surfaces are flat and well-fitted. Titebond Original Wood Glue achieves 3,600 psi shear strength on hard maple, with 77% wood failure—meaning the wood breaks before the glue fails. (In India, Fevicol SH is a widely available PVA equivalent for interior work; Fevicol Marine for outdoor pieces.)
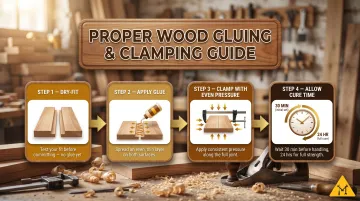
Follow these steps:
- Dry-fit before applying glue to confirm alignment
- Apply even glue coverage on both surfaces
- Clamp with even pressure across the joint
- Allow proper cure time (minimum 30 minutes, full strength in 24 hours)
Use yellow PVA glue for most interior projects and waterproof glue for anything exposed to moisture.
Sanding and Finishing
Sand in grit progression—never skip grits. For softwoods like pine, start at 120 grit and finish at 180-220. Skipping grits leaves scratches visible under finish.
Typical progression: 80 → 120 → 180 → 220.
Always sand in the direction of the grain to avoid cross-grain scratches.
Once the surface is smooth, choose your finish based on the project's use:
- Oils and penetrating finishes — Easy to apply, natural look, low protection. Good for decorative pieces.
- Polyurethane and lacquer — More durable, with better moisture and abrasion resistance. Best for tables, shelves, and high-use surfaces.
Woodworking Safety You Can't Ignore
Woodworking tools—hand or power—demand respect, not fear. The goal is to build habits that become second nature, so you can focus on the work, not the risk.
Non-Negotiable Safety Equipment
- Safety glasses or goggles (always—ANSI Z87.1 rated)
- Hearing protection when using power tools (anything over 85 dB)
- Dust mask or respirator (NIOSH-approved N95 minimum)
Wood dust is a serious long-term health risk. OSHA classifies wood dust exposure limits at 5 mg/m³ respirable fraction, while NIOSH recommends 1 mg/m³ and identifies wood dust as a potential occupational carcinogen.
Safe Tool-Handling Habits
- Keep blades sharp: Dull blades require more force and are more likely to slip or cause kickback
- Never remove guards from power tools
- Keep workspace organized and free of clutter
- Always know where your hands are relative to the cutting path
Most Common Beginner Mistakes
- Rushing cuts: Speed comes with practice. Take your time on every pass — a hurried cut is when accidents happen.
- Skipping clamps: Holding wood by hand while cutting is one of the fastest ways to get hurt. Always secure the workpiece first.
- Misusing tools: A chisel is not a pry bar. Using tools outside their intended purpose damages equipment and creates unpredictable hazards.
5 Beginner Woodworking Projects to Build Real Skills
The best beginner projects teach transferable techniques, produce something useful, and don't require expensive tools. See each project as a skills test rather than just a finished object.
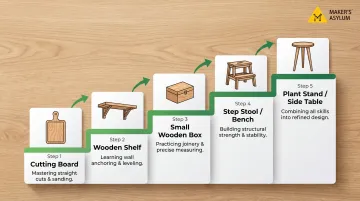
Cutting Board
The ideal first project: requires milling lumber flat and square, gluing up multiple pieces without gaps, and sanding to a smooth finish—three of the most foundational skills in woodworking. If your cutting board is flat and tight, you're ready for more complex projects.
Wooden Shelf
A simple wall shelf teaches accurate measuring, straight cutting, and basic fastening—and produces something immediately useful. Start with a butt-joint shelf, then progress to a dado-jointed version once comfortable.
Small Wooden Box
The all-in-one skill builder: combines precise cutting (four walls must be consistent), joinery practice, and finishing in one compact project. Beginner-friendly options include finger joints or mitered corners, both achievable with basic tools.
Step Stool or Small Bench
Building something weight-bearing introduces structural assembly—where joints must be strong, not just visually correct. A natural progression from flat projects to three-dimensional furniture and a manageable introduction to mortise and tenon practice.
Plant Stand or Side Table
The graduating project for someone who has built the previous four. Introduces legs, stretchers, and more complex joinery—producing a piece of furniture with real presence and lasting use. At this stage, access to a full woodshop with a drill press, table saw, and experienced makers around you becomes necessary. Maker's Asylum in Moira, Goa operates a dedicated woodshop where beginners work alongside mentors on exactly these kinds of first furniture builds.
Tips to Learn Woodworking Skills Faster
The fastest way to build skill is to commit to real projects rather than practicing indefinitely on scrap wood. Mistakes on real projects are more memorable—and more motivating—than mistakes on throwaway pieces. Start imperfect, finish the project, and identify one or two things to do better next time.
Three habits consistently separate beginners who plateau from those who improve quickly:
- Join a structured workshop or makerspace — Access to tools, mentors who catch bad habits early, and a community of fellow makers accelerates learning faster than solo practice. Maker's Asylum's Maker Skills woodworking program offers hands-on, structured sessions in Goa, with both 2-day and 6-day options, plus flexible online/offline formats that include hardware kits and facilitated projects.
- Commit to real projects, not exercises — Finishing something functional, even imperfectly, teaches more than drilling practice joints on scrap. Identify one or two specific improvements for the next build and move on.
- Try one new technique with each project — A different joint, a new wood species, a different finishing method. Rotating through techniques builds a broader skill base than repeating the same approach on identical projects.
Frequently Asked Questions
What skills are needed for woodworking?
Core skills include accurate measuring and marking, controlled cutting (cross-cuts and rip cuts), basic joinery (butt joints, dadoes, mortise and tenon), and sanding/finishing. The mindset skills—patience and willingness to learn from mistakes—matter just as much as technical ability.
What is the golden rule of woodworking?
"Measure twice, cut once" is the most cited golden rule. Wood is a finite material, and a cut that's too short cannot be undone. Precision before cutting is the most important habit a beginner can develop.
How long does it take to learn basic woodworking skills?
Basic skills like straight cuts, simple joinery, and sanding can be developed over a few weeks of consistent practice. Competence with foundational projects typically comes within 2-3 months with regular, focused sessions.
What is the easiest woodworking project for a beginner?
A cutting board or simple wooden shelf are the most beginner-friendly starting points. They teach essential skills while producing something immediately useful and achievable without advanced tools.
What type of wood is best for beginners?
Softwoods like pine are affordable, easy to cut, and ideal for practice. Hardwoods like teak or sheesham (Indian rosewood) are more durable for finished pieces and widely used in Indian furniture and décor. Always use kiln-dried lumber to prevent warping.